I've uploaded a new version of the Laser Slicer script to the 'scripts' page. This new version writes out SVG polygons instead of lines. I've done this as a first step to modifying the script to make architectural model sections. As SVG polygons positions can only be written as pixel positions I have included a DPI selection dialogue If the DPI is set to the DPI of the machine controlling the laser cutting than the scale should be correct. I have not heavily tested this so comments welcome on that front.
Another thing to be aware of is that this version of the script will absolutely not take non-manifold geometry, whereas the old version would; an example of this is Suzanne's head which, surprisingly, is non-manifold. So check geometry first. I'll add a warning flag for this at some point, but that is for another day.
If you are using the script purely for laser cutting you can keep using the old script with its non-manifold forgiveness.
Sunday 4 November 2012
Wednesday 29 August 2012
Laser Slicer
I've written a little script, available on the scripts page, to slice up a mesh in Blender and export the slices as shapes in a SVG file that can be cut on a laser cutter. The mesh should be a manifold solid.
The script creates a panel within Blender's 3D tools menu where the thickness and dimensions of the cutting material can be specified. The slices will be roughly arranged to conform to the dimensions of the cutting material, although it does not do a perfect job of this, and exports a SVG file with the name 'blender file name'-laser.svg to the directory where the Blender file sits. The slices are all grouped together in the SVG file, but if you ungroup this top-level grouping then each slice can be rearrange on the page. Slices are taken in the z-direction so make sure the mesh is orientated properly. By default 1 Blender unit is 1 metre. AS SVG files do not understand dimensions the scaling of the SVG file might change when loading it into your laser cutting software, so check for this. Below are the slices through the head of our holy mother, Suzanne.


The script creates a panel within Blender's 3D tools menu where the thickness and dimensions of the cutting material can be specified. The slices will be roughly arranged to conform to the dimensions of the cutting material, although it does not do a perfect job of this, and exports a SVG file with the name 'blender file name'-laser.svg to the directory where the Blender file sits. The slices are all grouped together in the SVG file, but if you ungroup this top-level grouping then each slice can be rearrange on the page. Slices are taken in the z-direction so make sure the mesh is orientated properly. By default 1 Blender unit is 1 metre. AS SVG files do not understand dimensions the scaling of the SVG file might change when loading it into your laser cutting software, so check for this. Below are the slices through the head of our holy mother, Suzanne.


Alas poor Suzanne, I knew her well.
Thursday 23 August 2012
IES lights in Blender Cycles
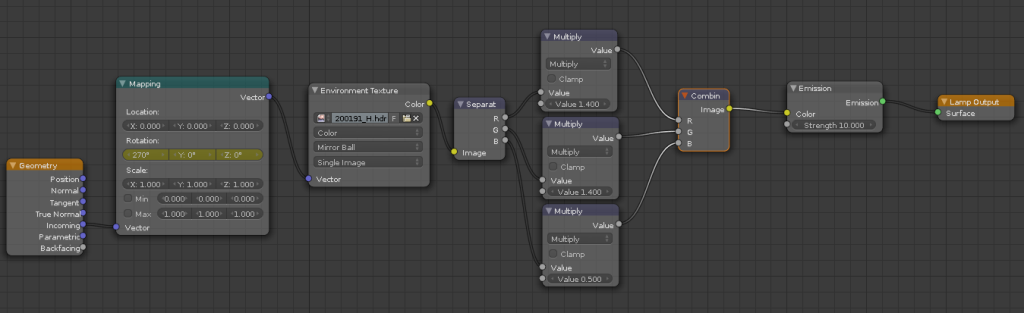
IES photometric luminaire files can now be rendered, with a bit of a workaround, in Cycles. Point lamps in Cycles can accept environment textures, and since Blender 2.63 these environment textures can be High Dynamic Range (HDR) images. The correct HDR representation of an IES described lamp can therefore be loaded as an environment texture onto a point lamp and rendered. It is important that the lamp is a point lamp as this ensures that the incoming light ray sees the correct pixel of the texture, providing the mapping is as desired. The node arrangement below (specifically the 270 deg in the x rotation dialogue of the mapping node) achieves a mapping where the light is pointing downwards (-ve Z).
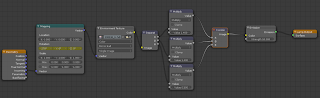 The multiply nodes allow you to change the colour of the light.The limiation with this arrangement is that rotation of the lamp in Blender does not rotate the texture (because it's a point lamp) so the rotation has to be changed in the mapping node to match the lamp rotation. This limitation has been overcome, rather cleverly, by gexwing at Blenderartists. Gexwing's node arrangement can be found in this thread. I've had some problems with this node arrangement when doing gpu rendering though so your mileage may vary.
The last piece of the jigsaw is the generation of the HDR texture from an IES file. The bad news is is that this requires another renderer; Radiance. The good news is I've written a Python script to help with the process. Radiance needs to be installed on your system, or more specifically the binaries oconv, ies2rad, rpict, rcalc and pvalue must be in your system path, and the file source.cal must be in your library path. The binaries and scripts for multiple packages can be found here. The script, called ies2hdr.py, is available from the scripts page, but as it's only short I've included the code here:
With your system terminal navigate to the directory containing the ies files you want to convert and if you have made the ies2hdr.py file executable simply type ies2hdr.py and hit enter. If it is not executable then type python ies2hdr.py. Naturally you'll need Python installed on your system too. I am going to convert this into a Blender add-on too eventually, and the system Python installation will then no longer be required. The script may not work as is on Windows. If not try replacing single with double quotes, and vice-versa, in the long subprocess line. If it worked you should now have an HDR file for each IES file, and it is these HDR files that are loaded into the Environment Texture node with a mirror ball mapping.
The simple video below shows single and dupliverted IES lights in Cycles.
IES lights in Blender Cycles from Ryan Southall on Vimeo.

This work is licensed under a Creative Commons Attribution 3.0 Unported License.
The last piece of the jigsaw is the generation of the HDR texture from an IES file. The bad news is is that this requires another renderer; Radiance. The good news is I've written a Python script to help with the process. Radiance needs to be installed on your system, or more specifically the binaries oconv, ies2rad, rpict, rcalc and pvalue must be in your system path, and the file source.cal must be in your library path. The binaries and scripts for multiple packages can be found here. The script, called ies2hdr.py, is available from the scripts page, but as it's only short I've included the code here:
#!/usr/bin/python

import subprocess, glob
spheregeo = open('sphere.rad', "w")
spheremat = open('sphere.mat', "w")
spheregeo.write("sphere_plastic bubble ball\n     0\n     0\n     4  0 0 0 1")
spheremat.write("void plastic sphere_plastic\n     0\n     0\n     5  1 1 1 0 0.5")
spheregeo.close()
spheremat.close()

filelistIES = glob.glob('*.IES')
filelisties = glob.glob('*.ies')
filelist = filelisties+filelistIES

for file in filelist:
    filebase = file.split(".")[-2]
    subprocess.call("ies2rad -i 0.001 -t default -o "+filebase+" "+file, shell=True)
    subprocess.call("oconv sphere.mat sphere.rad "+filebase+".rad > "+filebase+".oct", shell = True)
    subprocess.call("rpict -ab 0 -vta -vp 0.0 0 0 -vd 0 0 -1 -vu 0 1 0 -vh 360 -vv 360 -x 500 -y 500 "+filebase+".oct | pvalue -d -h -H | rcalc -e '$1=3.149*$1;$2=3.149*$2;$3=3.149*$3' | pvalue -r -H -h -d -y 500 +x 500 > "+filebase+".hdr", shell=True)
With your system terminal navigate to the directory containing the ies files you want to convert and if you have made the ies2hdr.py file executable simply type ies2hdr.py and hit enter. If it is not executable then type python ies2hdr.py. Naturally you'll need Python installed on your system too. I am going to convert this into a Blender add-on too eventually, and the system Python installation will then no longer be required. The script may not work as is on Windows. If not try replacing single with double quotes, and vice-versa, in the long subprocess line. If it worked you should now have an HDR file for each IES file, and it is these HDR files that are loaded into the Environment Texture node with a mirror ball mapping.
The simple video below shows single and dupliverted IES lights in Cycles.
IES lights in Blender Cycles from Ryan Southall on Vimeo.
This work is licensed under a Creative Commons Attribution 3.0 Unported License.
Subscribe to:
Posts (Atom)